Wednesday, 27 February 2013

Working with XML in PHP

Hey guys !! Writing an article after a long long time !! Been a month since i last wrote an article (courtesy mid semester exams) . So today i will give you a basic intro as to how you will load an xml file in php and add stuff to it . It's applications ? Well you may have a sitemap which is to be uploaded in real time as more links are added to your website . Or say you want to store data in xml format and would make an ajax call to the file etc .


 Example of a sitemap.xml file :-

<?xml version="1.0" encoding="UTF-8"?>
<urlset xmlns="http://www.sitemaps.org/schemas/sitemap/0.9">
<url>localhost/account/id/nraider0207</url>
<url>localhost/account/id/anuragdas</url>
</urlset>


So how can you open up and edit an XML File ?
Consider the following fragment of code :


$xml = new DOMDocument();
$xml-&gt;load("C:\wamp\www\phpweb20\public\sitemap\sitemap.xml");

$root = $xml-&gt;firstChild;
$newElem = $xml-&gt;createElement('url');
$root-&gt;appendChild($newElem);
$txt = $xml-&gt;createTextNode("http://localhost/account/id/example");
$newElem-&gt;appendChild($txt);
$xml-&gt;save("C:\wamp\www\phpweb20\public\sitemap\sitemap.xml");


Let us consider the fragment of code line by line :
The first line creates a new object , which might be used to represent an entire HTML/XML document . Since both xml and html semantics are identical , so this can be used for creating/editing html too . The next line will load the file as given by the location . The next line selects the first child of the document root (since we specified $xml as document root in the first line , if you pass along any other element , the first child of that element will be selected) . In the example i cited above the element is selected . In the following line i create a new element with the name (like the other url's i created before as given in the example) . To push this new element into we use the appendChild method in the next line . Finally we have to populate the element with some contents , preferably in the form of text . For that we use the createTextNode method in the following line , followed by appendChild like before . Then the last and final , but the most important step , which is saving the file . For that we use the save method which takes as a parameter the path to the xml file .


Sunday, 3 February 2013

PHP Tutorial . Chapter 5 . PHP Control Statements (Part 1 if-else statement)

What fun is programming if you don't have control over the code ? Best coding practices include writing code that responds differently to different situations . Suppose you have a code let's say , which takes in the type of an employee in an office and accordingly outputs the salary for that position , lets say , what would you do ?

( Cookies again for C Programmers , this section is actually same as the if-else you were accustomed to before !! )

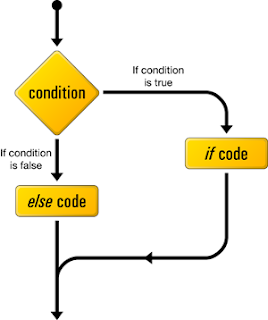
The most popular control statement in any programming language is the if-else construct . So how to use the if else construct ? Let's follow the following example and things will seem pretty easy then .

Algorithm :


Example

Lets say that we have a variable that stores the type of an employee at an office . We will check that variable and print out the corresponding salary .


$a = "General Manager";

if($a=="General Manager")
echo "1000000";
else if($a=="CEO")
echo "2000000";
else if($a=="Chairman")
echo "3000000";

?>

The above code outputs 1000000 .

Also an important aspect of php code is that it continues from the last block . Suppose you have a file containing both php and html . You have a block of php code , then you have some html and then again a block of php code , php will continue from the last line of the previous block . This will be clear from the following example .


Example


$a = 5 ;

if($a==5)
{
echo "The number is equal to 5
";
$a++;
echo "Now it's value is :- ".$a."
";
}
else if($a>5)
{
?>


echo "The number is greater than 5
";
echo "Also this statement is in the second php block
";
}
else
{

echo "The number is lesser than 5
";
echo "Also this statement is in the second php block
";
}

?>

This code won't show any error even though the else-if block is spread across the two blocks . This is quite a flexible feature !! It comes in handy if you want to place some html code within the conditions or within an incomplete block .

Friday, 1 February 2013

Chapter 4 . Output (echo and print statements)

Obviously you guys don't want to write php code which does not output anything !! That's why you're here !! Today i'll cover some of the basic output methods in php . I will cover two of the most basic output methods today , and i will introduce you to some advanced output methods which we'll cover later on .


ECHO

Firstly the command which i use the most (okay i'm being partial) , ECHO , the echo command can be used in any one of the following ways :-

echo "This is the text that'll be printed !! ";
echo("This is the text that'll be printed");
echo "This is the text "."that'll be printed" ; // The . joins the two strings and prints them

You can also use commas in the echo without parenthesis :-

echo "This is the text","that'll be printed";

However  you can't use commas in the one with parenthesis .

If you want to print variables , you can do it in the following way :-

echo $a;
echo "The value of a is :- ".$a;
echo "The value of a is {$a}";

However if you use single quotes in the last statement , the sentence will be printed as it is without the $a being substituted by the value it's holding .

PRINT

So what's the basic difference between print and echo ? Well as we saw that echo can take multiple arguments or strings and output them together . However that is not so in case of print . In this case you can have only one argument . Also print returns a value which can be used to determine whether the print statement succeeded or not .

Eg :-

print("Hello World !!");
print($a);


Other methods :- There are other advanced methods like print_r() -> Used to print out the array details or var_dump() -> Used to print out the object details , i'll cover these when i cover the respective chapters on array and objects !!